2.9 Million Views for My YouTube Channel – DannyRocksExcels

2.9 million viewsThis morning, I passed the 2.9 Million views milestone for my DannyRocksExcel’s YouTube Channel!

Thank you to all who have supported my Excel tutorials since I began posting them in August, 2008.

Top 10 Excel YouTube Videos Year-to-Date in 2013

Here are the Top 10 Videos that have been viewed so far (January 1 – March 21) in 2013. Click on the hyperlink to watch the video(s) on YouTube:

  1. How to Create an Interactive Pivot Table Chart – 65,095 Lifetime views
  2. How to Use Advanced Filters in Excel – 84,557 Lifetime views
  3. How to Add a Check Box Control to an Excel Form – 87,327 Lifetime views
  4. Compare 2 Excel Lists to Spot the Differences – 84,325 Lifetime Views
  5. Use Excel’s Built-in Data Form to Edit & Filter Records – 65,325 Lifetime views
  6. Use the Solver Tool in Excel – 46,035 Lifetime views
  7. How to Use an Excel Data Table for “What-if” Analysis – 72,694 Lifetime views
  8. How to Merge Multiple Excel Workbooks to a Master Budget – 104,376 Lifetime views
  9. How to Create a Summary Report from an Excel Table – 38,502 Lifetime views
  10. Import Excel Data into Microsoft Access – 54,601 Lifetime views

Quickly Improve Your Excel Skills

I have created many Video Tutorial Packages that I offer for sale at my secure online shopping website – http://shop.thecompanyrocks.com I invite you to visit and preview my training resources for MS Excel and the other programs in the Microsoft Office Suite.

The “Special Bundles” of videos are very attractively priced!


Share and Enjoy:
  • Add to favorites
  • Facebook
  • Twitter
  • Technorati
  • Print
  • email
  • Digg
  • StumbleUpon
  • del.icio.us
  • Yahoo! Buzz
  • Google Bookmarks
  • Orkut
  • SphereIt
  • Sphinn

The 10 Most Watched Excel YouTube Videos for September 2012

My YouTube Channel – DannyRocksExcels – had 141,586 individual views during the month of September 2012:

Here is a list – with Hyperlinks – to the 10 Most Watched Excel Videos

Top 10 YouTube Excel Videos

  1. Compare Two Excel Lists to Spot the Differences– 5,304 views in September
    1. Go to this Blog Post on my website
  2. How to Merge Multiple Excel Workbooks to a Master Budget – 4,915 views in September
    1. Go to this Blog Post on my website
  3. How to Use Advanced Filters in Excel– 4,660 views in September
    1. Go to this Blog Post on my website
  4. How to Add a Check Box Control to an Excel Form– 4,301 views in September
    1. Go to this Blog Post on my website
  5. Use the Built-in Data Form in Excel to View and Filter Records– 3,948 views in September
    1. Go to this Blog Post on my website
  6. How to Create a Summary Report from an Excel Table-3,932 views in September
    1. Go to this Blog Post on my website
  7. How to Create an Interactive Excel Pivot Chart– 3,696 views in September
    1. Go to this Blog Post on my website
  8. Consolidating Data from Multiple Excel Worksheets by Position– 3,618 views in September
    1. Go to this Blog Post on my website
  9. How to Use the Solver Tool in Excel– 3,532 views in September
    1. Go to this Blog Post on my website
  10. How to Use an Excel Data Table for “What-if” Analysis– 3,513 views in September
    1. Go to this Blog Post on my website

Thanks to my 4,500 Subscriber on YouTube!

I extend my heartfelt thanks to my many loyal viewers and subscribers to my Excel video tutorials. Your feedback and requests for solutions have formed the foundation for my Excel Training Videos.

9 Essential Excel 2010 Skills

9 Essential Excel 2010 Skills

Learn More About my Extended Length Excel Video Training Resources

I have created a series of Extended Length Video Training Resources in the category of “Master Excel in Minutes.” I invite you to follow this link to learn more about my new series of videos.

Share and Enjoy:
  • Add to favorites
  • Facebook
  • Twitter
  • Technorati
  • Print
  • email
  • Digg
  • StumbleUpon
  • del.icio.us
  • Yahoo! Buzz
  • Google Bookmarks
  • Orkut
  • SphereIt
  • Sphinn

How to Use a Check Box to “Toggle” Conditional Formatting On or Off in Excel

Sort by Color in Excel

Sort by Color in Excel

In my previous Excel Tutorial – “Conditional Formatting to Dynamically Format Dates” – I demonstrated how to  apply Conditional  Formatting based upon the number of days have passed since last contact with a customer. Now I will extend what you just learned.

Three Techniques in this Video:

  1. How to extend  Conditional Formatting Rules to additional cell ranges.
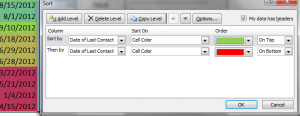
  2. How to use the “Sort by Colors” feature introduced in Excel 2007.
  3. How to add a Check Box Form Control that will “toggle” the Conditional Formatting On or Off.

Paste Special “Live Preview”

I demonstrate a great new feature introduced in Excel 2010, “Live Preview” for Paste Special. You will use Paste Special – Formats to extend the rules for Conditional Formatting to a new range of Cells

Sort by Color

Beginning with Excel 2007, you can now sort fields based upon the color of a font or a cell background. I show how this works.

The Check Box Form Control

The “key concept” to understand when using Excel’s Form Controls is the “Cell Link.” With a Check Box Control, the value in the Cell Link is TRUE when the box is “checked” while the value is FALSE when it is Unchecked. We can use this information to create a “Conditional Format based upon a Formula.”

Conditional Formatting Rules

When you base Conditional Formatting upon a Formula, the result of that formula must return TRUE in order apply this formatting. Setting the background cell color to “White” effectively “hides” the previous background cell colors.

Shop for The 50 Best Tips for Excel 2007

Shop for The 50 Best Tips for Excel 2007

Resources Offered for Sale

I encourage you to visit my secure online shopping website – http://shop.thecompanyrocks.com – to preview the many training resources that I offer you. Check out my latest Excel Training Videos:

Watch this Video in High Definition

Click on this link to watch this video in High Definition on my YouTube Channel – DannyRocksExcels


Share and Enjoy:
  • Add to favorites
  • Facebook
  • Twitter
  • Technorati
  • Print
  • email
  • Digg
  • StumbleUpon
  • del.icio.us
  • Yahoo! Buzz
  • Google Bookmarks
  • Orkut
  • SphereIt
  • Sphinn

Using the Built-in Excel Data Form to Edit, Enter and View Records

Data Form in Excel

Data Form

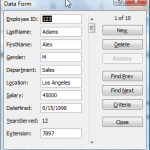
Excel has a built-in Data Form which is very useful for viewing all of the fields (up to 32 of them) associated with a single record. When you have lots of “Fields” in your “Data Set” and you do not want to do a lot of horizontal scrolling to view or edit the values in the cells, use this Data Form.

There is a limit of 32 fields when using Excel’s built-in Data Form.

Customize the Quick Access Toolbar

However, it does not appear as a Ribbon Command in Excel 2007. To use the Data Form add the Form Command to your Quick Access Toolbar (QAT) – I show you how to do this in the video.

Personally, I do not recommend the Excel Data Form for entering new records in your data set. I like to add Data Validation drop-down lists to ensure data integrity and this feature is not available in the Data Form. However, you can use Criteria to quickly find records for viewing and editing in the form.

Filtering Data with the Data Form

I give you a brief introduction to some of the new filtering options available in Excel 2007. I will cover this in greater detail in another lesson.

Subscribe to My Video Podcast on iTunes

I invite you to subscribe to my free video podcast, “Danny Rocks Tips and Timesavers” on iTunes. Click here to go directly to my iTunes podcast. I have had over 25,000 downloads since I began my podcast in June of 2010.

Watch this video in High Definition

Click here to go to my DannyRocksExcels YouTube Channel.

Watch Video Now

Master Excel in Minutes Video Training Resources

I have created a series of extended length Excel Video Training Resources. I invite you to visit my secure online shopping site to: Learn how to “Master Excel in Minutes – Not Months!”

Share and Enjoy:
  • Add to favorites
  • Facebook
  • Twitter
  • Technorati
  • Print
  • email
  • Digg
  • StumbleUpon
  • del.icio.us
  • Yahoo! Buzz
  • Google Bookmarks
  • Orkut
  • SphereIt
  • Sphinn

How to Speed Up Data Entry on Forms By Using Named Cell Ranges

You can speed up data entry on an Excel form by creating – and using – named cell ranges. This also improves data accuracy, because the data entry clerk only has to hit the “Enter” key after each imput; the curosor automatically moves to the next cell in the named range that you applied to your form!

There is one “got’cha” step in this process. As you will see in this video, it is important to observe the position of the “Active Cell” in your selection!

The 50 Best Tips

The 50 Best Tips Series

Key Points Covered

  • Hold down the “Ctrl” key as you click on the cells in your non-contiguous range.
  • Use labels and cell shading to identify the cells that require data input.
  • When selecting your non-contiguous cells, choose the cell that you want to be the “Active Cell” last.
  • You can enter a formula or value into all of the cells in a range with “Ctrl+Enter.”

Try this out  on a form that you use at work. Remember to create a “name” for your data input cells. “Named cell ranges” are saved when you create a copy of your workbook – so this technique can be easily duplicated by saving the file with a new name.

Click here to watch this video in High Definition, Full Screen Mode on my YouTube Channel – DannyRocksExcels

Learn how to “Master Excel in Minutes – Not Months!”

Share and Enjoy:
  • Add to favorites
  • Facebook
  • Twitter
  • Technorati
  • Print
  • email
  • Digg
  • StumbleUpon
  • del.icio.us
  • Yahoo! Buzz
  • Google Bookmarks
  • Orkut
  • SphereIt
  • Sphinn

How to Add a Data Validation Drop Down List to an Excel Form

Several viewers wrote to me after I posted my previous video – “How to Add a Combo Box Control to an Excel Invoice Form” to suggest that there is another way to create a “drop down list” for a form. Yes, you can use Data Validation in Excel and use “Allow from List” as your setting. Use the “Stop Style” to prevent a user from typing in a value that is not in the list.

In this Excel Training Video I compare both approaches: Using a Combo Box Control and Adding a Data Validation Drop Down List. Both work well on Invoice Forms. However, you will use a different function to “lookup” other values – e.g. Unit Price – depending upon your choice:

  • With a Combo Box Control, use the =INDEX() function to find the “Unit Price” for the product selected in the Combo Box
  • With a Data Validation Drop Down List, use the =VLOOKUP() function to find the matching “Unit Price.”

Let me know which approach that you prefer. Try both – expand your Excel Skill Set. Add your comments below or send me an email with your thoughts and suggestions: danny@thecompanyrocks.com

You can start to shop for my DVD, “The 50 Best Tips for Excel 2007” by clicking this link.

Learn how you can “Master Excel in Minutes”

Share and Enjoy:
  • Add to favorites
  • Facebook
  • Twitter
  • Technorati
  • Print
  • email
  • Digg
  • StumbleUpon
  • del.icio.us
  • Yahoo! Buzz
  • Google Bookmarks
  • Orkut
  • SphereIt
  • Sphinn

How to Add a Combo Box Control to an Invoice in Excel

If you are creating or modifying an Invoice Form in Excel, you will want to add a Combo Box Control to allow users to select products from a listing. The key in formatting your Combo Box Control is to choose the correct cell to contain the “Cell Link.”

Cell Link in Form Control

I think that you will benefit from “seeing how this is done” in this video lesson. I know that I always struggled with “reading about” Excel Form Controls. Once you see how important the “Cell Link” placement is, you will better understand how Combo Box Controls work.

Use INDEX Function

Once we have formatted the Combo Box, we need to be able to look up other values to place on our Invoice. In this example I demonstrate how to use the INDEX() Function to lookup the “Unit Price” for each product selected from the Combo Box list on the Invoice. As a best practice, I recommend that you use “Named Ranges” for the “array” that you Index. The INDEX() Function has three arguments:

  1. The ARRAY to Index – In this case our “named range” with three fields (Product Name, Unit Price, Cell Link)
  2. The ROW reference – In this case the cell in the ARRAY that contains our CELL LINK for the Combo Box
  3. Optionally, the COLUMN reference – in this case “2” for the 2nd Column in the ARRAY (Unit Price)

Let me know if my videos in this series have helped you to understand how to use Form Controls in Excel. It took me some time to figure out how they worked; I hope that I can save you some time and ease your frustration in apply them to your forms. Add your comments below or send me an email – danny@thecompanyrocks.com

Find Additional Videos for Form Controls in Excel

Form Controls include Option Buttons, Spinners, List Boxes and more. Here is a link to the other videos in my series on Form Controls in Excel.

Watch Tutorial on YouTube

If you prefer, follow this link so that you can watch this video on my YouTube Channel – DannyRocksExcels

Resources Available at My Online Shopping Site

I invite you to visit my new, secure online shopping site  where you can Learn how you to “Master Excel in Minutes – Not Months!

Share and Enjoy:
  • Add to favorites
  • Facebook
  • Twitter
  • Technorati
  • Print
  • email
  • Digg
  • StumbleUpon
  • del.icio.us
  • Yahoo! Buzz
  • Google Bookmarks
  • Orkut
  • SphereIt
  • Sphinn

How to Add Scroll Bar Controls to Excel Forms

This is the fourth in my continuing series of Excel training video lessons on Adding Form Controls to your worksheets. Here, I demonstrate how to Add Scroll Bar Controls to a Loan Scenario. Form Controls help to make your Excel worksheets “interactive,” and they are great tools to add when you distribute spreadsheets to users who may not be proficient in Excel.

Understand the Cell Link

The key concept to understand with Form Controls is the “Cell Link.” The form controls are merely “drawing shapes” until you actually link them to a cell that controls their output. The “got’cha” step for Scroll Bars – as with Spin Buttons – is that the Maximum Value is 30,000. So, if you want a control to show a loan amount of, for example, $300,000.00 you make the Maximum value 300 and then create a formula that references the “cell link” and multiplies it by 1,000.

In my research on Form Controls, I rarely find authors who mention this point – and, in my experience, this is how most Excel users get “tripped up” when they want to add Form Controls to workbooks to make them interactive. Watch as I walk you through each step in this process.

Please, let me know if this video lesson has helped you to better understand how Excel Form Controls work. Add your comment below – I promise to respond to your comments!

Danny

You can click on this link to view the other videos in my series on Form Controls in Excel.

Learn how to “Master Excel in Minutes – Not Months!”

Share and Enjoy:
  • Add to favorites
  • Facebook
  • Twitter
  • Technorati
  • Print
  • email
  • Digg
  • StumbleUpon
  • del.icio.us
  • Yahoo! Buzz
  • Google Bookmarks
  • Orkut
  • SphereIt
  • Sphinn

Create Interactive Excel Forms Using Option Button Controls

This is the third in my series of video lessons that show you how to add Form Controls to an Excel worksheet. Option Buttons, inside a Group Box, are a great way to make your forms “interactive” – to give your end-user multiple options. For example, a choice of shipping methods for their order. Or, to see how different “down payment” options effect their mortgage payments.

The key to understanding how Excel Form Controls operate is to see how the value in the “cell link” changes when you choose an option. The cell link for an Option Button translates a “text expression” into a numeric value. For example, “Surface” translates to “1” for a shipping option.

In this Excel Training Video, I introduce the =CHOOSE() Function. It is rare that I find a client who has ever used this function. Once you see how useful it is, you will start to use it instead of struggling through multiple =IF() Functions. It is really a great “hidden gem” of an Excel Function!

Click on this link to go to my Archive of Excel Video Lessons on Forms. 

You can also find additional groups of related videos by selecting a “Category” from the drop-down menu on the right side bar of any page on my website.

Learn how to “Master Excel in Minutes – Not Months!”

Share and Enjoy:
  • Add to favorites
  • Facebook
  • Twitter
  • Technorati
  • Print
  • email
  • Digg
  • StumbleUpon
  • del.icio.us
  • Yahoo! Buzz
  • Google Bookmarks
  • Orkut
  • SphereIt
  • Sphinn

Create User Friendly Excel Forms Using Spin Button Controls

An Excel Form is great way to distribute an Excel worksheet to your customers or field representatives. Most of the time, you do not want them to type values into a cell. You want to make this Form as “user friendly” as possible! You want to add “Spin Buttons” to your form, so that the user can simply click to change cell values up or down in the increments that you want to display.

A perfect example: A Mortgage Loan Scenario where – by clicking the Spin Buttons – your client can see what their monthly payment will be. This is my second lesson covering Excel’s Form Control Tools. Watch as I demonstrate how to “work around” the Form Controls limits of Maximum Amount for a Spin Button (30,000) and also how to increment interest rates by 1/4 of a Percent.

From personal observation, I know that many people start to create an Excel Form and then just give up in frustration. I did too – in the beginning! Watch me demonstrate how to avoid the traps of the “got’cha” steps in this short Excel Training Video.

Check out the great tips that I offer on my DVD, “The 50 Best Tips for Excel 2007.” Click here to start shopping.

Learn how you can “Master Excel in Minutes – Not Months!”

Share and Enjoy:
  • Add to favorites
  • Facebook
  • Twitter
  • Technorati
  • Print
  • email
  • Digg
  • StumbleUpon
  • del.icio.us
  • Yahoo! Buzz
  • Google Bookmarks
  • Orkut
  • SphereIt
  • Sphinn