How to Dynamically Color-Code Dates with Conditional Formatting in Excel

Conditional Formatting for Dates

Conditional Formatting for Dates

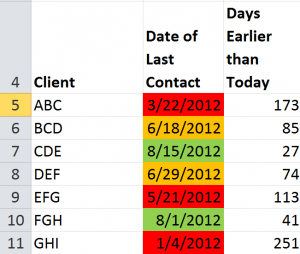
One of my viewers wants to learn how to “dynamically” color-code cells that contain dates. She is monitoring the frequency of contact with her clients and she wants Excel to automatically apply:

  • One background color to cells where it has been less than 60 days since last contact
  • A different color when the time frame is between 60 and 90 days
  • A third color when it has been over 90 days since the last contact with a client

Here, I demonstrate how she can do this using Conditional Formatting Rules. However, this will only work if you are using Excel 2007 or Excel 2010.

Understanding Dynamic Date Functions

In order to make this visualization “dynamic,” I make references to cells that contain the =TODAY() Function. This is a “volatile” function that updates automatically based upon the date in your computer system’s clock. I use this to classify the last date of contact with her clients.

Improvements in Conditional Formatting

Beginning with Excel 2007, you can now apply multiple rules that use formulas. Remember that when you use a formula, it must evaluate as “TRUE” in order to apply the formatting that you specify.

Formulas Used to Apply Conditional Formatting

Conditional Formatting Rules

Rules for Conditional Formatting

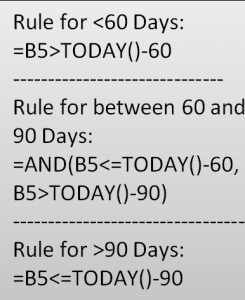
To make it easier for you to practice this skill, I have posted this table that details the formulas that I used for each of the three rules in my video tutorial.Note that with the middle condition, I use the =AND() Function. All logical tests must answer TRUE for the AND() Function to return TRUE.

It will take a little bit of practice for you to become comfortable with these formulas. As a Best Practice, I recommend that you create a table of formulas so that you can see how a “tweak” in your formula can turn a FALSE answer into a TRUE answer.

Related Video

Follow this link to Part Two in this Series. I demonstrate how to “toggle” Conditional Formatting On or Off by using a Check Box Control in Excel.

Watch this Video in High Definition

Follow this link to watch my Excel Tutorial in High Definition on my YouTube Channel – DannyRocksExcels

Get the Best Tips and Training for Excel

Click on this link to learn more about my best-selling DVD-ROM, “The 50 Best Tips for Excel 2007.” This link will take you to my secure online shopping website –  http://shop.thecompanyrocks.com

Subscribe to my Video Podcast on iTunes

Here is the link to go to my free Video Podcast, “Danny Rocks Tips and Timesavers” on iTunes.


How to Use SUMIF in Excel to Total Year-to-Date Sales

One of my viewers asked for my help to use the SUMIF Function in Excel to total Year-to-Date (YTD) Sales. Generally, the SUMIF Function is very easy to set up and use. However, when you need to refer to a “date” in the criteria argument, there is a “Got’cha” step.

How to Write the Formula for Year-to-Date Sales

=SUMIF(Date, “<=”&TODAY(), Sales) Notice how the <= comparison operator is enclosed within ” ” (Quotation Marks) and I use the & (ampersand) to join the TODAY() Function. Be careful when you write this fomula. In my experience, when I try to write THIS formula in the “Functions Argument” Dialog Box, I almost always get an Error Message.

Create and Use Named Cell Ranges in SUMIF Function

As a best practice, I encourage you to create and use “Named Cell Ranges” in your formulas. This is especially helpful with the SUMIF, SUMIFS, COUNTIF, COUTIFS functions because you are usually looking inside extensive ranges of data.

Another Way to Total Year-to-Date Sales

For many years, I did not realize that there was a SUMIF Function. So, I used to create an extra column and write to formulas to compute the YTD Sales. If you do want to or need to see YTD sales in each cell, I show you how to do this by writing just one formula.

Watch Lesson in High Definition

Follow this link to view this video lesson in High Definition on my YouTube Channel – DannyRocksExcels

Download My Free Video Lessons on Pivot Tables

Click here to learn about my 24 minute video recordings “Introducing Pivot Tables.” I have two versions – One for Excel 2003 and one for Excel 2007. I am offering both of them as a “free of charge” downloadable product!

Learn How to Use Date Functions in Excel

Excel has a group of functions that help you to calculate dates. For example, the number of days between two dates or the date on which an invoice will be payable.

This is the second in my series of lessons where I demonstrate how to enter and calculate dates and times in Excel. Here is the link to part one.

Excel Tip List

Excel DVD Tips

The date functions that I demonstrate on this video are:

  • TODAY()
  • NOW()
  • DATE()
  • DATEVALUE()
  • WORKDAY()
  • NETWORKDAYS()
  • EOMONTH()

The last three date functions require you to activate the Analysis ToolPak Add-in. You will also learn some valuable and time saving keyboard shortcuts.

You can watch this video in High Definition, Full Screen Mode on my YouTube Channel – DannyRocksExcels

Learn how to “Master Excel in Minutes – Not Months!”

How to Use the Undocumented DATEDIF Function in Excel

Want to get in on a secret? The DATEDIF() Function is a well-kept secret in Excel. You will not find it in the list of Excel Functions. And, you will not find any documented Help for it from Microsoft! Amazing, because it is a great function to use. Be sure to bookmark this video, because this may be the only help that you get for the DATEDIF Function!

DATEDIF() has three required arguments: Start_Date, End_Date, Date Code.

Six Date Codes

  1. “Y” – Gives you the difference in “years” between the starting and ending dates.
  2. “M” – Gives you the difference in “months” between the starting and ending dates.
  3. “D” – Gives you the difference in “days” between the starting and ending dates.
  4. “YM” – Ignores the years and days to give you the difference in “months” between the starting and ending Months.
  5. “YD” – Ignores the years to give you the difference in “days” between the starting and ending Days and Months.
  6. “MD” – Ignores both the years and the months to give you the difference in “days” between the “day” of the Start_date and the “day” of the End_date.

You can add “clarifications” to the results by using the “&” (Ampersand) and a “text label.”

I use DATEDIF frequently – for example to find out a person’s exact age or to document the number of years an employee has been worked for you.

Follow this link to visit my Archive of  Video Lessons for Time and Date Functions in Excel

Click here to watch this Excel Video Lesson in High Definition, Full Screen Mode on YouTube.

Learn how to “Master Excel in Minutes – Not Months!”

Viewer Request: How do I calculate dates in the future?

Today’s lesson is my answer to a viewer’s question: “How does Excel calculate a date in the future?”

The viewer wrote me because they were having trouble writing a formula that would return a date “N-Months” in the future. Or “3 years in the future” from a specific starting date.

I am asked this question frequently. In this short Excel video lesson I demonstrate how you write the formula.

Here are the steps to follow in this Excel Training Video:

  1. Use the AutoFill feature and Options to increment your “Starting Date.” I recommend using your “right-mouse button” to AutoFill because it automatically brings up a Menu of Options when you release the Right-Mouse Button.
  2. In response to the viewer’s question, we will choose “Fill Months.”
  3. Remember that we are using a “Hard-Coded” date as our “Starting Date,” so each value is really a “constant value.” This may not be the optimal result that we are seeking.
  4. In order to provide flexibility (with your starting date) you need to learn how to construct a formula that will increment (in this case the MONTH) our values.
  5. Use the “DATE() Function.
  6. For each of the “Arguments,” use the YEAR(), MONTH() and DAY() functions.
  7. To answer my viewer’s question we use MONTH(A2) +1 in the “Month Argument.”
  8. To “Increment the Year,” we use YEAR(A2) +1 in the “Year Argument.”
  9. Finally, write a “Formula” to verify that Excel is properly accounting for “Leap Years.”

Search My Index to all Excel Video Training Topics

The 50 Best Tips for Excel 2007″ DVD is now available for purchase. I invite you to visit my online bookstore for more details.

Use the =SUMIF() Function to Tally YTD Sales

Many of my clients keep a “running total” of sales. They put “Dates” in Column “A” and enter each day’s sales in Column “B.” Next is Column “C” which contains the formula =SUM(B$:B250). That is fine – it works.

However, if you use the =SUMIF() function to total Year-to-Date (YTD) Sales you gain flexibility, save space and save time – because you do not have to scroll down several screens to see your YTD Sales total!

In this video, I show you how to use “Named Ranges” in a =SUMIF() Formula to keep track of your cumulative sales total.

Here are the steps to follow in this lesson:

  1. Traditionally, you use a formula like =SUM(B$3:B250) to give you a “running total” for YTD Sales.
  2. The=SUMIF() Function returns the SUM of vales that meet a “Single Criterion” (the IF portion) .
  3. The 1st Argument is – What is the Range that you want your criteria to evaluate? Consider “Naming” this Range – it makes it easier to write your formula and explain your formula.
  4. The 2nd Argument is – What is your criteria? Be sure to use this syntax – “Comparison Operator”
  5. In the video example we also need to include the “&” to join the cell “D2.” Cell “D2,” in this example, contains the Function =TODAY()
  6. The 3rd Argument is – What Range do you want to SUM to return the values that meet your Criteria?
  7. The =DATE() Function returns the serial number for a specific date. It requires 3 Arguments. =Date, Year, Month, Day)
  8. You will save time and gain productivity when you “Name Cells and Ranges” and then you them in your formulas.
  9. Use the F3 shortcut key to “Paste Names” into your formulas.

News! My DVD, “The 50 Best Tips for Excel 2007” is now available to purchase. I invite you to visit my online bookstore for more details.

Find the Excel Video Lesson that you want – Index to all Excel Topics