Learn How Excel Stores and Formats Dates

Formatting Options for Dates in Excel

Multiple Formatting Options for Dates in Excel

In my experience, a high percentage of Excel users run into problems when working with Dates – and Times! In fact, I estimate that, during the past two weeks, I received 25 questions from viewers – they were asking for my help when working with Dates in their Excel workbooks.

Here, in this tutorial, I gathered together the most common problems that my viewers asked me help them to solve.. Gaining a firm understanding of how Excel Stores and Formats Dates is an Essential Skill that you must master!

Dates Stored as Serial Number

Dates are stored as a serial number in Excel. For example, if you type the number 1 into a blank cell and then change the formatting to a Short Date, you will see 1/1/1900 displayed. This is the date on which Excel began to keep track of time.  Dates that are entered correctly align to the right side of the cell.

Concepts Covered in this Tutorial

  • Use the =TODAY() Function – this date will automatically update.
  • Use the Keyboard Shortcut Ctrl + ; (semi-colon) to “Date Stamp” a cell – this is a static date.
  • Change the Formatting of a Date to e”General” – this reveals the actual serial number that Excel stores for the Date.
  • Apply Custom Date Codes to format cells that contain Dates.
  • Learn why it is essential that you always enter years using four digit codes – to avoid “the Century Break.”
  • Learn how to clear all formatting from cells before pasting or entering data. in them
  • Use the Text-to-Columns Wizard to convert “unfriendly” Date Text Labels to “usable” Numeric Date Values .
  • Tips for copying and pasting a range of cells formatted as USA Short Dates to a customized “European” Date Format.

Visit My Secure Online Shopping Website

I invite you to stop by my secure online shopping website – http://shop.thecompanyrocks.com – to take a look at all of th many training resources that I offer to you.

Watch Video in High Definition

Follow this link to watch my Excel Tutorial in High Definition on my YouTube Channel – DannyRocksExcels

Share and Enjoy:
  • Add to favorites
  • Facebook
  • Twitter
  • Technorati
  • Print
  • email
  • Digg
  • StumbleUpon
  • del.icio.us
  • Yahoo! Buzz
  • Google Bookmarks
  • Orkut
  • SphereIt
  • Sphinn

Essential Excel Skill #2: Selecting Cells Efficiently

Essential Excel Skill #2

Essential Excel Skill #2

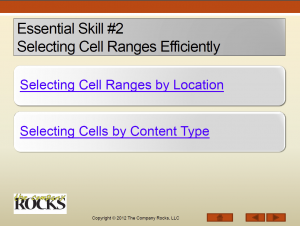
Learning how to select cells – and ranges of cells – efficiently,  is an Essential Excel Skill. Here, I demonstrate two tips from my extended length video training resource, “Nine Essential Excel Skills.”

On my DVD-ROM, I devote 13:30 minutes and two separate video tutorials to this skill.  The entire DVD-ROM is nearly four hours in length and it contains 25 individual video tutorials.

Selecting Cells Efficiently in Excel

For a contiguous range of cells, you can use these methods:

  • Ctrl + A to select all of the cells in the current range.
  • Ctrl + Shift + Directional Arrow to select all of the cells that contain data moving in that direction.
  • Hold down the Shift Key while you tap the directional arrow keys.
  • Press the F8 Key to enter “Extend Mode” and tap the directional arrow keys.

Selecting Cells by Type of Content

One of the most valuable – if underused – tools in Excel is the Go To Special Dialog Box. In this lesson, I demonstrate how to use the Go To Special commands to, first, select all of the cells that contain Numeric Formulas and then all of the cells that contain numeric constants.

As a Best Practice, I always use the Go To Special Dialog Box whenever a  client sends me an Excel Workbook. In my opinion, this is the easiest way to “inspect” an Excel worksheet. I most frequently use Go To Special to find cells that contain:

  • Types of Formulas (Numbers, Text, Logical, Etc.)
  • Types of Constants (Numbers, Text, etc.)
  • Data Validation
  • Conditional Formatting
  • Blanks

Secure Online Shopping Website

I invite you to visit my secure shopping site – http://shop.thecompanyrocks.com/ – to learn more about the many training resources that I offer you.

Watch My Video in High Definition

Follow this link to watch my Excel Tutorial in High Definition on my YouTube Channel – DannyRocksExcels

Share and Enjoy:
  • Add to favorites
  • Facebook
  • Twitter
  • Technorati
  • Print
  • email
  • Digg
  • StumbleUpon
  • del.icio.us
  • Yahoo! Buzz
  • Google Bookmarks
  • Orkut
  • SphereIt
  • Sphinn

Essential Excel Skill #1: Entering Data Efficiently

My latest Excel Video Training Resource is “Nine Essential Excel Skills.” I have published versions for both Excel 2010 and Excel 2007. You can purchase them as either a DVD-ROM that I ship to you; or in a version that you can Download immediately.

Why Nine Essential Excel Skills?

As I created this Excel Video Training Resource, I had two distinct customers in mind:

  1. Everyday Excel users who know that they could get more out of Excel if only they had a structured approach to training that used “real life” business examples.”
  2. Experienced Excel users who want to prepare to take the Microsoft Office Specialist (MOS) 2010 or 2007 Certification Examinations for Excel.


Essential Skill #1 Video Lessons

Essential Skill #1 Video Lessons

Essential Excel Skill #1

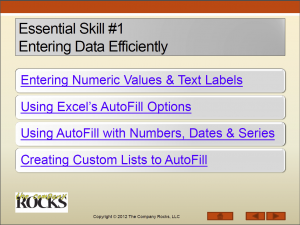
I have identified Essential Excel Skill # 1 as “Entering Data Efficiently.” In the world of business there is a common acronym – GIGO – which means, “Garbage In delivers Garbage Out.” In order to produce accurate and meaningful reports in Excel, you MUST begin with data that is entered correctly.

Entering Time and Date Values

In my experience, many Excel users incorrectly enter Time values and Date values. Times and Dates are “Numeric Values.” When Time and Date Values are entered correctly, they align to the right-side of the cell. Once they are entered correctly, you can change their formatting to suit your purpose.

Keyboard Shortcuts for Current Date & Time

  • Ctrl + ; (semi-colon) enters the Current Date into the cell. This creates a “Date Stamp.”
  • Ctrl + Shift + : (colon) enters the Current Time into the cell. This creates a “Time Stamp.”
AutoFill Weekdays Only

AutoFill Options – Weekdays Only

Speed Up Data Entry with AutoFill Options

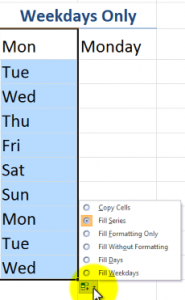
Use AutoFill to quickly – and accurately – fill in the Months of the Year and the Days of the week. I demonstrate – in detail – how to take advantage of the many AutoFill Options that are available. For example, to AutoFill Weekdays Only! I am confident that you will gain many productivity tips from the video tutorials in this Skills chapter.

Fill Series Dialog Box

Many Excel users have never used the “little gem” that is the Fill Series Dialog Box. As you will learn in the video tutorial, you can quickly fill in a long series of numeric values by using the “Step Value” and “Stop Value” fields in this dialog box.

Download the Complete Step-by-Step Instruction Guide – for Free!

I am so confident that you will want to purchase my video training resource, that I am offering you the opportunity to download – for Free! – the 29 page Instruction Guide that is included in “Nine Essential Excel Skills.” Click on the link to begin to download either version as a PDF:

Learn More About My Video Training Resources

My “Master Excel in Minutes – Not Months” series of video training resources is growing quickly! Follow this link to see the resources that are available now!

Watch My Excel Tutorial in High Definition

Follow this link to watch my tutorial in High Definition on my YouTube Channel – DannyRocksExcels

Watch Video Tutorial Now


Share and Enjoy:
  • Add to favorites
  • Facebook
  • Twitter
  • Technorati
  • Print
  • email
  • Digg
  • StumbleUpon
  • del.icio.us
  • Yahoo! Buzz
  • Google Bookmarks
  • Orkut
  • SphereIt
  • Sphinn

Two Glowing Reviews for my Excel Video Tutorials

Today, two of my customers posted glowing reviews for my Excel Video Tutorials. Thank you! Thank you! Thank you!

9 Essential Skills for Excel 2010

9 Essential Skills for Excel 2010 Video Tutorial

“Nine Essential Skills for Excel 2010”

“In my opinion the 9 Essential Skills for Excel 2010 , is an outstanding training video. It covers a lot of the required intermediate requirements. One thing that really stands out for me is the method of presentation. Danny always:

  • a) explains what he is going to do in simple language 
  • b)demonstrates what he has just explained
  • c)shows you where to find the icons on the ribbon
  • d)shows you the keyboard shortcuts to use(they actually appear on the video as they are used.

The video also had a good introduction to the value of using tables. Like all of Danny’s videos this should be a fantastic success.

– John J, Canada

Pivot Tables for Excel 2003

“Excel 2003 Pivot Tables to Summarize, Analyze, and Present Information”

“A mere few hours with your Excel 2003 course and I was able to
perform pivot table operations which had eluded me for over a year
using multiple other publications totaling nearly 1,500 pages: while those sources are terrific, each of us learns differently, your courses certainly fill that learning gap for me.

I deal with mostly with cumulative metrics, that is, incremental, week to week.

After two evenings of your course, I was able to build tables presenting the year, month, quarter & weekly totals of the multiple tools deployed, and, amazingly, display the incremental changes down to a week-to-week basis.

You had mentioned that you hoped I enjoyed the course, of course, I enjoyed the course – indeed, but after a year-plus struggle with several other sources, the *learning* from your course was the true reward!”

– Paul B., Colorado

Learn More About My Video Training Resources

I am confident that you will learn many valuable tips and techniques from my extended length Excel Video Training Resources.My Motto is:

“I work hard to make it easy for you to get the most out of Microsoft Excel”

Follow these links to learn more about my video training resources:

Share and Enjoy:
  • Add to favorites
  • Facebook
  • Twitter
  • Technorati
  • Print
  • email
  • Digg
  • StumbleUpon
  • del.icio.us
  • Yahoo! Buzz
  • Google Bookmarks
  • Orkut
  • SphereIt
  • Sphinn

How to Correct #N/A Error Messages for Excel’s VLOOKUP Function

Fix the #N/A Error Message

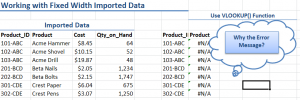
A colleague of mine – who is an experienced Excel user – cannot figure out why he is receiving those ugly #N/A Error Messages when he is using the VLOOKUP Function in Excel.

After a quick look at his workbook, I spotted the problem!

Use the TRIM() Function to Remove Extra Spaces

It turns out, that the data source – housed on the company’s Main Frame Computer – is using “Fixed Width” Fields. So, while only 7 characters are visible, I used the LEN() Function to determine that the field was actually storing 12 characters.

The #N/A Error Message for VLOOKUP()

The #N/A Error Message appears when a Match cannot be found for the Lookup Value in the Left-most Column of the Table_Array when using VLOOKUP(). In this case, my viewer was trying to match a lookup value that contains 7 characters to a value in a field formatted to contain 12 characters. This is what produced the #N/A Error!

Paste Special Values

The final step to correct this problem is to use Copy – Paste Special – Values to replace the Formulas with the values of those formulas.

Essential Excel Skills

9 Essential Skills for Excel 2010

9 Essential Skills for Excel 2010 Video Tutorial

In this video, I cover three Essential Excel Skills:

  1. Essential Functions – VLOOKUP()
  2. Text Functions – LEN() and TRIM()
  3. Paste Special Options

I cover each of these skills – and more – in greater detail on my new 4-Hour Video Training Resource, “Nine Essential Skills for Excel.”” Click on the links below to learn more about:

Watch Video in High Definition

Follow this link to watch my Excel tutorial in High Definition on my YouTube Channel – DannyRocksExcels

Share and Enjoy:
  • Add to favorites
  • Facebook
  • Twitter
  • Technorati
  • Print
  • email
  • Digg
  • StumbleUpon
  • del.icio.us
  • Yahoo! Buzz
  • Google Bookmarks
  • Orkut
  • SphereIt
  • Sphinn

How to Clear Cell Formatting In Excel

Numbers Stored as Text

Numbers Stored as Text

In my previous tutorial, I demonstrated how to clear all text formatting from all slides in a PowerPoint Presentation. Several viewers contacted me about publishing a tutorial that demonstrates how to clear formatting from ranges of cells in Excel.

Use the Clear Formatting Command

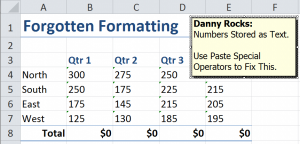
From my experience, I had found that a great many Excel users expect that formatting as well as contents are cleared when you press the Delete Key. This is not the case. The Delete Key only clears the contents of the cells in the selected range.

Use the Clear Formatting Command in the Editing Group on the Home Tab of the Ribbon. If you are using Excel 2003 or earlier, you will find this on the Edit Menu.

Numbers Stored as Text

As a Best Practice, I strongly recommend that you verify that the numeric values that you will be using in formulas are truly numbers and not numbers stored as text. This, unfortunately is a common case whenever you are working with data that has been imported from a main frame computer or other external sources. In this lesson, I demonstrate how to use Paste Special Operators to quickly convert numbers stored as text to true numeric values.

9 Essential Skills for Excel 2010

9 Essential Skills for Excel 2010 Video Tutorial

Nine Essential Skills for Excel

I cover, in-depth,  Entering and formatting data as well as using Paste Special Options on my new video resource, “Nine Essential Skills for Excel.”

  • Four hours of video training
  • 25 individual video tutorials
  • Step-by-Step Instructional Guide
  • Excel Practice Files included

Download It or Order My DVD-ROM

Watch My Tutorial in High Definition

Follow this link to watch my Excel Tutorial in High Definition on my YouTube Channel – DannyRocksExcels

Share and Enjoy:
  • Add to favorites
  • Facebook
  • Twitter
  • Technorati
  • Print
  • email
  • Digg
  • StumbleUpon
  • del.icio.us
  • Yahoo! Buzz
  • Google Bookmarks
  • Orkut
  • SphereIt
  • Sphinn

How to Use Lookup Functions in Excel – Take a Free Lesson from My Latest Video Training Resource

Video Lesson - Lookup Functions in Excel 2007

Video Lesson – Lookup Functions in Excel 2007

I have just published the Excel 2007 version of my latest video training resource, “Nine Essential Excel Skills.” And, I want to offer you the opportunity to watch a complete episode. This is one of the 25 video tutorials included on my video training resource. The complete package contains almost four-hours of focused Excel 2007 Training.

Lookup Functions in Excel 2007

Watch this complete 11 minutes and 30 second lesson, as I demonstrate how to use both the VLOOKUP() and HLOOKUP() Functions in Excel. I demonstrate how to return an “exact” match as well as how to return an “approximate” match. I use “plain language” to describe how to use Lookup Functions.

Learn More About My Video Training Resources

Here are the links to the specific product information pages for my latest video training resources:

Download My Step-by-Step Instructional Guide – for Free!

You can download a PDF of my Step-by-Step Instructional Guide for the “9 Essential Excel 2007 Skills” video training resource. I am offering this for free so that you can see the scope and detail of the training that I offer on my 4-hour video. Click on this link to begin the downloading process for my free Instructional Guide.

Watch this Lesson in High Definition

Follow this link to watch my Excel Tutorial in High Definition on my YouTube Channel – DannyRocksExcels

Watch Tutorial Now


Share and Enjoy:
  • Add to favorites
  • Facebook
  • Twitter
  • Technorati
  • Print
  • email
  • Digg
  • StumbleUpon
  • del.icio.us
  • Yahoo! Buzz
  • Google Bookmarks
  • Orkut
  • SphereIt
  • Sphinn

Instructional Guide “9 Essential Excel 2010 Skills” – Download for Free

Instructional Guide "9 Essential Excel 2010 Skills"

Instructional Guide “9 Essential Excel 2010 Skills”

I want you to discover the scope of the Excel Training that I offer on my new video tutorial, “9 Essential Excel 2010 Skills.” So, I am offering the PDF of the Step-by-Step Instructional Guide that accompanies the video tutorial.

Link to The Company Rocks Free Resources Page

Click on this link to begin the download process for the Instructional Guide.

Instructions for Downloading the Free Instructional Guide

  1. Add this product to your secure shopping cart at my website.
  2. During Checkout, you can choose to either Register or Shop as a Guest
  3. You will need to provide a valid email address in order to receive the actual link to download my Instructional Guide.
  4. Even though you will be downloading this product, I had to set it up as a physical product with “Free Shipping.”
  5. Shortly after you complete the checkout process you will receive an email that contains a hyperlink to the file that you will download.
  6. You will be downloading a “zipped” file. So, once the download is completed, be sure to “unzip” this file!
  7. I created my Instructional Guide using the free Adobe Acrobat Reader.

Read the Instructional Guide and then Purchase my Video!

I am convinced that once you see the scope of the training in Excel 2010 that I offer, you will want to purchase the video tutorial. I offer my video in tow versions:

List of the “9 Essential Excel 2010 Skills”

9 Essential Skills for Excel 2010

9 Essential Skills for Excel 2010 Video Tutorial

These are the 9 Essential Skills that I have identified for my video tutorial:

  1. Entering Data Efficiently in Excel 2010
  2. Selecting Cell Ranges Efficiently in Excel 2010
  3. Creating and Using Named Cell Ranges in Excel 2010
  4. Applying Styles and Formatting to Excel 2010 Worksheets
  5. Working with Structured Data Sets in Excel 2010
  6. Working with Excel 2010 Formulas and Functions
  7. Using Paste Special Options in Excel 2010
  8. Using Data Validation in Excel 2010
  9. Using Excel 2010 “What-if” Analysis Tools

Excel 2010 Practice Files Included

When you purchase my video tutorial, you receive the same Excel 2010 Worksheets that I used while filming each of the 25 video tutorials. Using the same files as you view my videos, you will be able to practice your new skills. And, of course, you also receive the same Instructional Guide that I am offering for free!

I welcome your feedback! Please send me your comments via email – danny@thecompanyrocks.com – or by adding a comment below.

Thank you!


Share and Enjoy:
  • Add to favorites
  • Facebook
  • Twitter
  • Technorati
  • Print
  • email
  • Digg
  • StumbleUpon
  • del.icio.us
  • Yahoo! Buzz
  • Google Bookmarks
  • Orkut
  • SphereIt
  • Sphinn

How to Create a Series of 30 Minute Time Intervals in Excel

How Excel Stores TimeOne of my readers tracks data points at 30 minute (half-hour) periods throughout the day. He asked me for some help in streamlining this process.

AutoFill the Step-value for a Series

You can use AutoFill in Excel to create this series. Here are the steps to take:

  1. In two adjacent cells, enter the beginning time value and the time that is 30 minutes later than the beginning time value.
  2. Select BOTH cells and AutoFill the cells in the range that you want to “populate.”

Calculate Decimal Number that Represents 30 Minutes

You can calculate the numeric value for a half-hour (30 minute) period:

  1. Use a Formula to subtract the Start Time from the End Time.
  2. Format the result as a Number with 6 Decimal Places.

In this case, the result is: 0.020833 which you can use as a Constant Value in a Formula.

Keyboard Shortcut to Enter the Current Time

Ctrl + Shift + : (Colon) will “time stamp” a cell.

How Excel Stores Time

While you can Format Time in a variety of ways, Excel must be able to recognize and store Time entries as Numeric entries! This means that correctly entered times align to the right-side of the cell. Time values are stored as a “decimal part of one” day. For example, 12:00 PM (Noon) is stored as 0.50 – 50% of the day has elapsed

Shop at My Secure Online Website

I invite you to visit my secure online shopping website – http://shop.thecompanyrocks.com – to view all of the resources that I offer you to improve your Excel skills.

Watch Tutorial in High Definition

Click on this link to watch this Excel Tutorial in High Definition on my YouTube Channel – DannyRocksExcels

Share and Enjoy:
  • Add to favorites
  • Facebook
  • Twitter
  • Technorati
  • Print
  • email
  • Digg
  • StumbleUpon
  • del.icio.us
  • Yahoo! Buzz
  • Google Bookmarks
  • Orkut
  • SphereIt
  • Sphinn

How to Create Hyperlinks in Excel

Hyperlink Dialog Box in ExcelOne of my viewers – Ben from the UK – wrote to tell me that he needs to learn how to create Hyperlinks in Excel in preparation for a job interview this week. He asked me that, since he could not find a decent YouTube video on this topic, to create a tutorial demonstrating ow to create Hyperlinks in Excel.

Hey, in these tough economic times, I am happy to help as many people as I can. However, given my time constraints – and, my need to make a living from my video resources – I invite you to purchase one or more of my many resources on my secure online shopping website – http://shop.thecompanyrocks.com

Topics Covered in this Excel Video Tutorial

In this video tutorial, I demonstrate how to:

  • Create a simple Hyperlink to another worksheet in your Excel workbook
  • Create Hyperlinks that “Return you” to your main “Dashboard” worksheet
  • Hyperlink to other programs – e.g. PowerPoint
  • Create hyperlinks that direct a viewer to send you an E-Mail message
  • Hyperlinks to websites

I am the first to admit that the Insert / Edit Hyperlinks Dialog Box is confusing and “too busy” for my tastes. However, in this video tutorial, I demonstrate how to navigate through this Dialog Box and also, how to get te most out of it. For example, how to change the “text displayed” for the Hyperlink while working in the Dialog Box.

Watch  this Video in High Definition

Click here – on this Hyperlink – to watch this video in High Definition on my YouTube Channel – DannyRocksExcels

View this Totorial Now!

Purchase My Resources to improve your Excel Skills

If you are in a similar situation as Ben – where you need to demonstrate specific knowledge of MS Office Programs Skills – why trust your luck? Rather, improve your skills – and your odds for securing a new job or a promotion!

I invite you to purchase one or more of my down-to-earth video tutorials. Visit my secure online shopping website – http://shop.thecompanyrocks.com

Share and Enjoy:
  • Add to favorites
  • Facebook
  • Twitter
  • Technorati
  • Print
  • email
  • Digg
  • StumbleUpon
  • del.icio.us
  • Yahoo! Buzz
  • Google Bookmarks
  • Orkut
  • SphereIt
  • Sphinn