Create a Web Query in Excel to Gather Updated Information

Web Query in Excel

Web Query in Excel

When you select, copy and paste data from a website into an Excel document, you get static images and data. When you want that data to be updated – or refreshed – with the latest information, you create a Web Query in Excel.

Follow the process that I demonstrate in this video and you will learn how to gain access to current information without having to leave Excel!

Create a Web Query

  • On the Data tab of the Excel 2007 Ribbon, select Get External Data – From Web.
  • In the Dialog Box – that resembles a “Web Browser” – type in the URL of the Website you want to search. Notice that the “Browse” Button is missing. My Best Practice is to make a copy of and paste in the URL of the website you want to search.
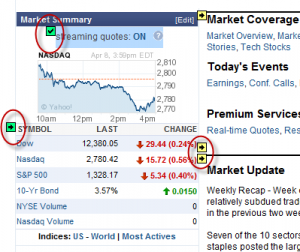
  • After you press the “GO” Button, you will see some “Yellow Arrow” markers on the website. These are the HTML Tables that you can select for your Web Query.
  • When you however your mouse over the Yellow Arrows, you will see a Blue Border around the HTML Table. Click the Yellow Arrow and a “Green Check Mark” indicates that you have selected this table. Continue to make your selections and then click “Import.”

Import Web Query

The final step is to decide where to place your Web Query, I usually accept the default selection of cell $A$1. There is an “Properties” Button that you can access now – or later. Press the “Add” Button and after a few seconds, you have imported the data from your Web Query.

As you will see in the Video for this lesson, it it easy to go back and Edit your Web Query or Change the Properties of the Query – e.g. to automatically Refresh every 60 minutes. You can also choose to Refresh the Query now.

Best Practice Suggestions

  • Use a separate session of Excel when setting Properties of your Web Query to automatically refresh. In this way, you will not slow down your work on another Excel project.
  • Gather your favorite Website URLs and paste them as Hyperlinks on a Worksheet. Select the Hyperlink prior to initiating a new Web Query. This will save you time as the Web Query Dialog Box does not have a Browse Button!

Watch Video in High Definition

Follow this link to watch this video in High Definition on my YouTube Channel – DannyRocksExcels

Learn How to Master Excel in Minutes – Not Months!
My Best Practice Tips for Importing External Data Into Excel

I created this Excel Training Video after helping a viewer who was having difficulty getting the correct results in his Pivot Table. The problem, it turned out, was not with the Pivot Table. Rather, it was with the way his underlying data was stored and formatted.

When to Store Numbers as Text Values

Get External Data From Commands

External Data Commands

Specifically, he had combined the records from multiple workbooks into a master table. The data came from multiple main-frame computers. However, in some workbooks he had the “Invoice Number” stored as a “Numeric” value while in other workbooks it was stored – properly – as a”Text” value. Excel will treat Invoice Number 678910 stored as a number differently from the same entry (678910) stored as a text value.

Here is the “rule of thumb” to follow: Unless you will be using the SUM, AVERAGE, PRODUCT, MIN or MAX functions in a field, store numbers as “TEXT Values.” A short list includes fields for telephone number, postal codes, customer numbers and invoice numbers.

Start with the Correct Data

When you Import External Data Into Excel, start off on the right footing. Import the fields that contain Invoice Numbers, Postal Codes and Telephone numbers as “Text” values. In my experience, I have found that trying to format these fields “after the fact” does not give me the results that I was looking for. Getting the External Data fields correctly formatted at the Import Data step is the key to producing accurate and informative Excel reports.

“The 50 Best Tips for Excel 2007” DVD-ROM

Secure Shopping Cart

This is one of the 50 Video Lessons that I offer on my DVD-ROM, “The 50 Best Tips for Excel 2007.” Click here to open a Secure Shopping Cart to purchase this DVD today. I guarantee your satisfaction. I will refund your purchase price if you are not 100% satisfied with my products.

Watch in High Definition mode on YouTube

Follow this link to watch this Excel video at DannyRocksExcels on YouTube.

How to Use Excel’s Transpose and Text to Columns Tools to Reorganize Your Data

This video lesson is in response to a viewer’s request. The information that he gets comes from a mainframe computer and the orientation of the data is horizontal (going left-to-right across columns. He wants to be able to reorganize this data to show it vertically (from top-to-bottom in rows. I use Excel’s Transpose tool to show him how to do this.

I also demonstrate an extremely useful Excel Tool – Text to Columns – to break apart an address block (City, State, Postal Code) into discrete fields – to help you to manage a mail merge or to sort and filter by State or by Postal Code.

(Note: Somehow this lesson “got lost” as I was reorganizing my website. So, I apologize in advance if you already viewed this lesson.)

If you enjoyed this lesson, I invite you to visit my online bookstore to shop for my DVD, “The 50 Best Tips for Excel 2007.” It is on sale now!

You can watch this Excel Video Lesson on YouTube – vist my channel – DannyRocksExcels

Related Videos

Get External Data in Excel 2007

I created this Excel Video Lesson in response to a viewer request. He wants to learn how to move files that contain dates, text and numbers from a different program into Excel. Excel 2007 gives you an easy to follow Wizard from the Data Tab of the Ribbon to Get External Data.

As I stress in this lesson – “Resist, resist, resist … the urge to go to the Office Button (File Menu) and choose Open. No, no , no… Use the Get External Data Wizard. Watch this short lesson to see how to bring information in from Word 2007 and from Access 2007. I also show you how to save an Excel 2007 file as a Text File (.txt) to make it easy to open it in almost any program.

If you enjoyed this lesson, I invite you to shop for my DVD, “The 50 Best Tips for Excel 2007.”The Store for The Company Rocks is a secure shopping site. And, I personally guarantee your satisfaction – or I will refund your purchase price! Click here to start shopping.

You can watch this Excel Training video on my YouTube Channel – DannyRocksExcels

Related Videos