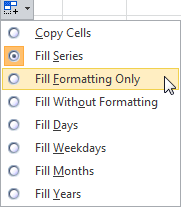
I begin this Excel Video tutorial by first, demonstrating how to use Excel’s AutoFill Options to increment a series of dates. Some of these AutoFill Options are:
- Fill Weekdays Only (Monday through Friday)
- Copy Formatting Only
- Increment by Adding one month to the previous cell
- Increment by Adding one year to the previous cell
Here’s a Tip: If you use your Right-mouse button to AutoFill a series, a menu of options will pop up automatically when you release the mouse. Try it!
Excel Functions and Formulas to Increment a Series of Dates
Two of my favorite Excel Date Functions are part of the “Analysis ToolPak” Add-in:
- The EDATE() Function – returns a “serial number” for a Month that is X number of months away from the starting date.
- The EOMONTH() Function – is similar to EDATE. However, it always returns the last Calendar Day of the Month that is X number of months away from the starting date.
In Excel 2007 and Excel 2010, the Analysis ToolPak Add-in is activated by default. In this video, I demonstrate how to activate it if you are using Excel 2003 or older.
Other Functions Used in this Video Tutorial
- The DATE() Function. Remember that if you use this function to increment by one-year intervals that you need to “nest” the Year(), Month() and Day() functions in the arguments. This is a “tricky” function to use.
- The WEEKDAY() Function. In the video, I nest this function inside an IF() Function in order to get a series of dates that include Monday through Friday only!
Related Video Tutorial
Watch This Video in High Definition
Follow this link to view this video tutorial in High Definition on my YouTube Channel – DannyRocksExcels
Shop for Excel Training Resources
I invite you to visit my secure online shopping website – http://shop.thecompanyrocks.com – to see all of the great training resources that I offer you.
Get my best-selling DVD-ROM, “The 50 Best Tips for Excel 2007” for only $39.95!
 How to use Excel's AutoFill Options and Formulas to Increment a Series of Dates [ 11:21 ] Play Now | Play in Popup | Download (1637)

