Keyboard Shortcuts to Enter and Edit Data Efficiently in Excel


Keyboard Shortcuts to Enter Data

Keyboard Shortcuts to Enter Data

This is the latest installment in my series of video tutorials where I demonstrate how to use Keyboard Shortcuts in Excel. In this tutorial, I demonstrate how to Enter and Edit Data Efficiently in Excel using Keyboard Shortcuts.

Tips Covered on Video Tutorial

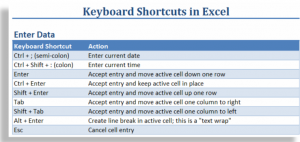
Here are the main Keyboard Shortcuts that I show you how to use on this video:

  • Enter Current Date in a cell.
  • Enter Current Time in a cell.
  • Use Ctrl + Enter to accept data entry and keep the focus on the current cell.
  • Use Ctrl + Enter to populate a range of selected cells.
  • Use Alt + Enter to “Wrap the Text” in a cell.
  • Use F2 to edit data inside a cell.
  • Use Ctrl + left & right directional arrows to move to the beginning of the next / previous word while editing in the cell.
  • Use ‘ (apostrophe) as the first character in a cell to make this a “text” entry.

Download my complete Chart of Popular Keyboard Shortcuts as a PDF 

 Follow this link to download – for free – my 5 Page Chart of Popular Excel Keyboard Shortcuts as a PDF.

Subscribe to my Video Podcast on iTunes

Here is the link to subscribe to my video podcast, “Danny Rocks Tips and Timesavers” on iTunes. It is offered for free!

Watch Tutorial in High Definition on YouTube

Follow this link to view this Excel Tutorial in High Definition mode on my YouTube Channel – DannyRocksExcels

Use Excel’s AutoFill Tools and Formulas to Increment Time Intervals

In my experience, many Excel users get “frustrated” when trying to enter and calculate Time Intervals. For example, setting up a schedule for meetings that begin and end in 45 minute intervals. After you watch this video tutorial, you will learn how easy it is to set up this type of schedule!

The Problem with Time in Excel

When it comes to entering Time Values, Excel will only accept a short list of Time Formats. For example, 6:00 AM is a valid Time Entry in Excel. However, Excel will treat 6:00 A.M. as a “text entry!” 6:00 AM is stored as the decimal value 0.25 in Excel. Decimals are numbers that Excel can calculate and increment. In this video, I demonstrate a shortcut that ensures that you always enter a Time Value as a Number.

How to Increment in Two-Hour Intervals

As I demonstrate in this video, use this formula to increment a series of two-hour time intervals:

=starting_cell + 2*(1/24)

In this case the (1/24) portion of the formula indicates a “one-hour segment.” 1 hour out of a 24 hour day. The +2 part of the formula indicates that you want to increment by 2 – of what? The answer is +2*(1/24) – by 2 hours.

To indicate a 15 minute increment use this formula:

=starting_cell + 15 * (1/24/60) – That is, divide each one hour segment (1/24) by 60 minutes (1/24/60) and multiply this by the number of minutes that you wish for your schedule.

Watch Part 1 of this Series – Increment Dates in Excel

Follow this link to watch Part 1 of this two-part series – “Use Excel’s AutoFill Tolls and Excel Functions and Formulas to Increment Date Intervals.”

View this Tutorial in High Defintion on YouTube

Click on this link to watch the video lesson in High Definition on my YouTube Channel – DannyRocksExcels

Get my best-selling DVD-ROM, “The 50 Best Tips for Excel 2007 for only $29.97