How to Clear All Underlying Cell Formatting in Excel

Clear Underlying Formatting

Clear Underlying Formatting

Have you ever typed data or a formula in a cell only to be surprised by the result? For example, you type in a number and then, unexpectedly,  Excel displays a Date or a Time in that cell. This happens frequently when you reuse an older Excel Worksheet of if you start working on a worksheet that a colleague or client has sent you.

Why does this happen?

Clear All Underlying Cell Formatting

In my experience, I have found that many Excel users mistakenly think that pressing the DELETE Key will “erase” the cells in the selection. No, No, No. The Delete key only erased the cell content – the data, text or formulas entered or pasted into the cell(s). The Delete key does NOT remove the Underlying Cell Formatting!

In this tutorial, I demonstrate how to remove the underlying cell formatting while leaving the cell Contents in place.

Topics Covered in this Tutorial

  • Using the Clear Formatting Command
  • Adding the Clear Command to your Quick Access Toolbar
  • Using Go To Special to Find and Select all cell that use either Conditional Formatting or Data Validation
  • Finding the Last Cell in your worksheet – you may be surprised to find a “remote cell” is NOT Blank!

View All the Resources that I Offer

I invite you to visit my secure online shopping website – http://shop.thecompanyrocks.com – to preview all of the resources that I offer.

Watch this Tutorial in High Definition

Follow this link to view this Excel Tutorial in High Definition on my YouTube Channel – DannyRocksExcels


How to Distinguish Cell Content from Cell Formatting in Excel

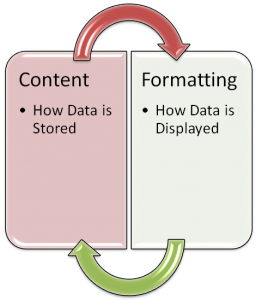
Cell Content vs Cell Formatting

Cell Content vs. Cell Formatting

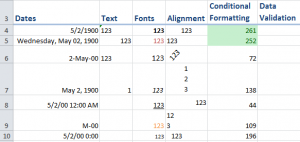
Many Excel Users are surprised to discover that the Delete Key does not clear the formatting for the selected cell or range of cells. This can cause some unusual “surprises” you you or one of your colleagues later uses this “Deleted” Cell Range!

On the other hand, some cells must be formatted properly in order to return the correct result. This is especially true for cells that contain Time and Date Calculations. For example, in order to properly calculate a Sum of Hours that exceeds 24 hours, you need to apply the Custom Format [h]:mm to the formula cell.

Topics Taught in this Tutorial

  • Adding the Clear Command to the Quick Access Toolbar (QAT).
  • Using Go To Special – Last Cell, to find the last cell in the worksheet that contains either content or formatting – or both!
  • Understanding how Excel Stores Dates (as a Serial Number) and Times (as a Decimal Number) vs. How you use Cell Formatting to make Dates & Times easier to understand.
  • Using Keyboard Shortcuts to add the Current Date – Ctrl + ; (semi-colon) or Current Time -Ctrl + Shift + : (colon), or to “Toggle” between Formulas and Displayed Results  -Ctrl + ~ tilde).

Visit My New, Secure Online Shopping Website

Stop by http://shop.thecompanyrocks.com to see the new products that I have created. You can also download – for FREE – my Chart of Popular Excel Keyboard Shortcuts when you visit.

Watch Tutorial in High Definition

Follow this link to view this Excel Tutorial in High Definition on my YouTube Channel – DannyRocksExcels
YouTube Tutorial for this Post

How to Customize the Quick Access Toolbar in Excel 2007

Quick Access Toolbar Office 2007

QUick Access Toolbar in Office 2007

Learning how to Customize the Quick Access Toolbar (QAT) in Excel 2007 or Excel 2010 is a great way to ease the “learning curve” when you upgrade versions.

In my experience, I have found that most people do not even realize that there is a Toolbar in Excel 2007, let alone that you can move it to a different location and to customize it!

What I Cover in this Video Tutorial

Here is what you will learn from this YouTube Video Tutorial:

  • To move the QAT to Show it Below the Ribbon (recommended!)
  • To add the most popular command buttons one at a time
  • To open the Customize Quick Access Toolbar Dialog Box
  • To find commands to add – including Command Not in the Ribbon!
  • To organize the commands on your QAT
  • To create a customized QAT for “specific workbooks”  – great for special projects!
  • To quickly add individual command buttons with a right-click of the mours
  • To add entire command button groups to the QAT with a right-click of the mouse – (recommended!)

Since this video is a little longer than usual, I am making it available exclusively on my YouTube Channel.

Watch Video in High Definition Mode

Follow this Link to view this tutorial in High Definition on my YouTube Channel – DannyRocksExcels
“The 50 Best Tips for Excel 2007” DVD-ROM

Purchase my DVD-ROM, “The 50 Best Tips for Excel 2007” – on sale now at http://shop.thecompanyrocks.com for only $29.97 USD!

Tips to Help You Remain Productive When Upgrading to Excel 2007

Beginning Level Videos for Excel

Videos at the Beginning Level - 50 Best Tips for Excel

I enjoy participating in several discussion and sharing groups on LinkedIn. In one group, the question was raised, “The Ribbon – Love it or Leave it?” Many group members wrote to say that they just cannot figure out the new user interface – The Ribbon. Others expressed frustration that they were much less productive in their work as they tried to make the transition to either Excel 2007 or Excel 2010. Some said that they simply gave up and returned to using Excel 2003.

Certainly, I felt frustrated and lost when I first began to use Excel 2007. So, let me share my best tips for quickly adjusting to and mastering the commands and tools in Excel 2007 – and Excel 2010.

Topics Covered in this Video

  • The Office Button in Excel 2007 to open, save and print Excel workbooks and to change Excel Options
  • 7 Standard Tabs on the Ribbon
  • Groups of related Command Buttons
  • Launchers to open up Dialog Boxes
  • Command Buttons with Menus
  • Showing the Quick Access Toolbar below the Ribbon
  • Customizing the Quick Access Toolbar
  • Working with the Mini Toolbar

Watch Video in High Definition on YouTube

Follow this link to watch this Excel Video Tutorial in High Definition on my YouTube Channel – DannyRocksExcels
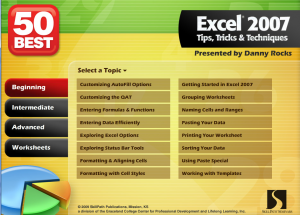
Purchase My DVD-ROM, “The 50 Best Tips for Excel 2007”

Here is the link to learn more about my best-selling DVD-ROM. You can purchase this from my online store using a secure shopping cart. On sale now for only $29.97 USD.


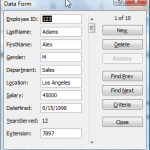
Using the Built-in Excel Data Form to Edit, Enter and View Records

Data Form in Excel

Data Form

Excel has a built-in Data Form which is very useful for viewing all of the fields (up to 32 of them) associated with a single record. When you have lots of “Fields” in your “Data Set” and you do not want to do a lot of horizontal scrolling to view or edit the values in the cells, use this Data Form.

There is a limit of 32 fields when using Excel’s built-in Data Form.

Customize the Quick Access Toolbar

However, it does not appear as a Ribbon Command in Excel 2007. To use the Data Form add the Form Command to your Quick Access Toolbar (QAT) – I show you how to do this in the video.

Personally, I do not recommend the Excel Data Form for entering new records in your data set. I like to add Data Validation drop-down lists to ensure data integrity and this feature is not available in the Data Form. However, you can use Criteria to quickly find records for viewing and editing in the form.

Filtering Data with the Data Form

I give you a brief introduction to some of the new filtering options available in Excel 2007. I will cover this in greater detail in another lesson.

Subscribe to My Video Podcast on iTunes

I invite you to subscribe to my free video podcast, “Danny Rocks Tips and Timesavers” on iTunes. Click here to go directly to my iTunes podcast. I have had over 25,000 downloads since I began my podcast in June of 2010.

Watch this video in High Definition

Click here to go to my DannyRocksExcels YouTube Channel.

Watch Video Now

Master Excel in Minutes Video Training Resources

I have created a series of extended length Excel Video Training Resources. I invite you to visit my secure online shopping site to: Learn how to “Master Excel in Minutes – Not Months!”

How to Combine Changes Made to Multiple Excel Workbooks

Review Changes Command

Review Changes Commands

Frequently, several people work on an Excel 2007 Workbook. Perhaps to create departmental budgets or to analyze regional sales results. When it is time to combine the work of these individuals into the Master Excel Workbook you do not want to resort to “copy & paste!” Fortunately, you do not have to. Use Excel 2007’s Compare and Merge Tool to do this for us.

However, in order to make this work there are several “gotcha steps” to be aware of. Watch this video lesson to see how to combine the individual work of three colleagues into a “merged workbook” for an upcoming event. I guarantee that this lesson will save you time and aggravation at “budget time” each year.

Subscribe to My Video Podcast on iTunes

This video is available to view and download – for free – as a Podcast at the iTunes store. Click here to go to the Danny Rocks Tips and Timesavers Podcast at iTunes.

(Follow this link to watch this Video Podcast from my website.)

Visit My Secure Online Shopping Website

Watch My Tutorial Now

Visit My Secure Online Shopping Website

If you enjoyed this Excel video lesson, I invite you to visit my online store to purchase my DVD, “The 50 Best Tips for Excel 2007.” It contains over 5 1/2 hours of focused video instruction in Excel 2007 Tips, Tricks & Techniques. Click here to shop using a secure shopping cart.


Related Excel Video Lessons:

Watch this Excel Tutorial in High Definition

Do you want to watch this Excel Video Lesson on YouTube? Follow this link to view it on my YouTube channel, DannyRocksExcels

Note: As of September 2012, this video has been viewed over 79,000 times on YouTube!