This is Part 2 of my two-part series of video tutorials where I demonstrate how to link an Excel Worksheet Tab Name and the contents of a Worksheet Cell.
In this lesson, I show you how to write an Excel Macro in VBA (Visual Basic for Applications) that will update the name of the Worksheet Tab based on the value of a cell in that worksheet.
Write Excel Macro in VBA
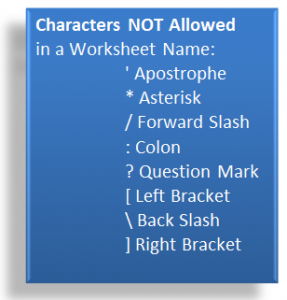
For this Macro, the first line of code will prevent the Macro from crashing if the cell contains one of the “disallowed” characters that you see in the diagram
On Error Resume NextThe second line of code initiates a “For – Next” loop of instruction
For Each ws In Thisworkbook.WorksheetsThe third line of code is the Instruction to follow in the “For – Next” Loop
ws.Name = Left(ws.Cells(1,5).Value, 31)Here, this instruction is saying – in plain English – “Nane this Worksheet (ws) using the leftmost 31 characters in the cell that is in the 1st row of the 5th column – (Cell E1)”
The reason for including 31, is that that is the maximum number of characters allowed in an Excel Worksheet Tab Name.
The fourth and fifth lines of code complete the macro – watch the video to see what they are (What a “tease” I am!!)
Run Macro from Command Button
In this lesson I also show you how to run this Macro from a command button that I add to the Quick Access Toolbar in Excel 2007 or Excel 2010.
Watch Video in High Definition on YouTube
Click on this link to watch this Excel Video Tutorial in High Definition on my YouTube Channel – DannyRocksExcels
Source for This Code
I found the code for this example in one of Bill Jelen, Mr. Excel’s Books, “Excel Gurus Gone Wild.”
Bill’s website is: http://www.mrexcel.com/
Watch Part 1 of this Series
Here is the link to Part 1 of this series. I show you how to write a Custom Excel Function to insert the Name of the Worksheet Tab into a cell on the worksheet.


