How to Calculate the Calendar Year Quarter for a Date in Excel

Formulas to Calculate a Calendar Year Quarter

Formulas to Calculate a Calendar Year Quarter

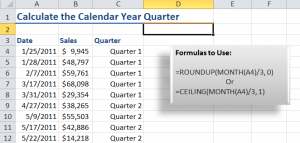
After watching my previous video tutorial, “How to Place Dates in a Fiscal Year Quarter,” several viewers requested that I demonstrate how to calculate the calendar year quarter for a date.

This requires “nesting” the MONTH() /3 Function inside either the ROUNDUP() or the CEILING() Function. I break these formulas down step-by-step in this video so that you can see how they work.

Formatting Numbers to Include Text

As a bonus, I demonstrate how to format the formula result cells to include the text “Quarter.” This is really simple to create as a custom format.

Download this Video Podcast from iTunes

You can watch and download this – and many of my – video tutorials for free at iTunes. Here is the link to my iTunes video podcast, “Danny Rocks Tips and Timesavers.”

Watch Video in High Definition

Follow this link to watch this Excel Tutorial in High Definition on my YouTube Channel – DannyRocksExcels

Visit my Secure Online Shopping Website

I invite you to visit my online shopping site – http://shop.thecompanyrocks.com – to preview and purchase my training resources. I guarantee your satisfaction 100%. I will refund your purchase if, for any reason, you are not satisfied with my products!


How to Place Dates in a Fiscal Year Quarter

Many organizations operate in a Fiscal Year – for example, April 1 through March 31 of the next calendar year. I get many requests from viewers for help with placing calendar dates into the proper Quarter for their Fiscal Year.

Excel Functions Used in Video TutorialWhile researching a question from one viewer, I cam across a very interesting formula that nests the “undocumented” DATEDIF() Function inside the CEILING() Function. I found this formula in the book, “Formulas and Functions with MS Excel 2003,” written by Paul McFedries. It is a very efficient formula.

What is Covered on the Video

Watch this video tutorial as I break down each step. As a Best Practice, I recommend that you break down a complex formula by working from the “inside out.” I start with the “nested” DATEDIF() function and then demonstrate the results of each formula detail.

Learn More About the “Undocumented” DATEDIF() Function

For various reasons, Microsoft does not offer any help or documentation for the very useful DATEDIF() Function. In fact, it is not even listed as a Function! However, it is very useful and often found in VBA (Visual Basic for Applications) coding. Here, are links to two videos that I created to help you understand how to use DATEDIF():

Learn How to Calculate a Calendar Year Quarter

In response to viewer requests, I created a companion video tutorial -” How to Calculate a Calendar Year Quarter in Excel.”

Resources Available at The Company Rocks

I invite you to visit my secure online shopping website – http://shop.thecompanyrocks.com – to preview the many resources that I offer for helping you to improve your software skills.

Watch Video Tutorial in High Definition

If you would like to watch my video tutorial for “Finding the Fiscal Year Quarter for any Date,” click on this link. I have posted it on my YouTube Channel – DannyRocksExcels

Watch this Video Now


Create an Accounts Payable Summary Report in Excel

Accounts Payable Status Summary

Accounts Payable

Here is another video lesson that I created to answer a question from one of my viewers. In this case, the request is for help in creating an Accounts Payable Summary Report in Excel.

Formula to Create Label for Status

My viewer wants to know how to create one formula that will report the status of an Invoice as “Paid,” “Pay Now,” or “Delay.” To do this I “nested” one IF() formula inside another IF() formula. I used the ISBLANK() function as my first “logical test” in the formula. ISBLANK returns either TRUE or FALSE, so it is a good Function to become familiar with.

One of my “best practices” when learning how to “nest” IF Formulas, is to create each one separately – to test the results – and then copy and paste them into the combined formula.

Use SUMIF() Function to Total Status

Now, that your formula returns a status label for each invoice, you can use the SUMIF Function to search in the Named Range “Status” for the cells that match the criteria (Paid, Pay Now, Delay) and then Sum the Invoice Amounts for each category.

Watch This Video in High Definition on YouTube

Here is the link to my YouTube Channel, DannyRocksExcels, where you can watch this in High Definition.

Download this Excel Workbook

Follow this link to go to my Public SkyDrive to download this workbook to practice with.

The versatile and valuable =IF() Function

MS Excel’s =IF() Function is a very versatile function and it is used in a variety of situations. Watch this short video lesson to learn how to use it when Grading Scores, Calculating Shipping Rates and “Trapping Errors.”

Here are the steps to follow in this lesson:

  1. The =IF() Function requires three arguments: A “Logical Test” – (which will return either a TRUE of a FALSE Response); the Value if “True,” and the Value if “False.”
  2. In my first example I have set up a simple scoring system for grades. For the Value if TRUE, I have entered “Pass.” Notice that the TEXT must be enclosed in ” “.
  3. In my second example, I have “nested” several =IF() functions inside the Value if FALSE Function Argument. You can “nest” up to 7 different IF() Functions in a formula.
  4. Notice how useful the =IF() Function is when you want to “trap an error.” Especially when you are starting to build a spreadsheet and many cells contain Zeros or NULL Values.

Find the Excel Video Lesson that you want – Index to All Excel Topics

News! My DVD, “The 50 Best Tips for Excel 2007” is now availabe to purchase. I invite you to visit my online bookstore for more details.